N64 Tutorial
A Short Introduction
This guide is for N64 emulation
newcomers, and wasn't intended for intermediate to advanced emulation users. The
information in this tutorial is broken down to a simple level, so advanced users
will most likely not benefit from this guide. If you are an experienced
emulation user, and find this tutorial adequate enough for an emulation
newcomer, then by all means, send them here. I should also note, that a minimum
resolution of 1024x768 is reccommended to view this document correctly (which
shouldn't be much of a problem with today's monitors).
Hopefully this tutorial will help you
learn how to play Nintendo 64 on your computer if you don't know how. I don't go
into a whole lot of detail right off the bat, so bear with me through this. The
goal of this tutorial was to make it simple enough for anyone to understand,
even if you know absolutely nothing about emulation or computers in general. It
just takes a little bit of knowledge, practice, experience, and
patience.
Browser Tip: You can hold in Control and use the mouse scroller to adjust text
size, but this document is best viewed in its original size.
Section 1: Get some ROMs A Nintendo 64 ROM is a 'read only' file containing N64 Cartridge data that has been extracted (a.k.a. dumped) via a special device that connects a N64 game to a computer. ROM stands for 'Read Only Memory' which is exactly what the data was before it was dumped off of the cartridge. (Just to clarify, dumping isn't "taking" the data off of the cartridge, it is -copying- it from the Game Cartridge to the Hard Drive.) When you manage to find ROMs or dump them yourself, they will most likely have the default image of what appears to be a blank file, with a N64 file extension. There are several different type of N64 ROM file extensions: .n64, .z64, .u64, .rom, .v64, .usa, .pal, .j64, etc.. there may be more. So, Super Mario 64 could look like: SuperMario64.n64, SuperMario64.u64, SuperMario64.v64, or basically anything above and possibly more. I may as well mention now ROMS can even be zipped, so SuperMario64.zip is also valid. Most N64 emulators can read zipped ROMs, which can save a lot of hard drive space if you have a large collection.
Section 2: Get Some Emulators Emulators are programs that can load the ROM data and present it to you, just like a console loads a cartridge and puts a picture on your television that responds to input. The goal of an emulator is to use your computer's hardware and operating system to emulate the instructions of the console through software. With the rise of the first N64 emulator ever, UltraHLE, came the first concept of 'High Level Emulation'. In a nutshell, HLE allows programmers to cut certain corners to improve speed and image quality in emulators, allowing higher resolutions for sharper graphics, hacks, and other special effects. The original concept of emulation, which can now also be known as Low Level Emulation (LLE), is to program the emulator to perfectly emulate every one of the systems instructions. A well programmed LLE emulator would provide perfect compatibility, but at the cost of much higher system requirements and the lack of special features such as higher resolutions. You don't need to know any of this to play some games, but overall it's interesting to know so you have a better understanding of why every game does not function correctly in every emulator, if in any emulator at all. When you first load an emulator, it will open up into an initially blank window. This window will display the game contents to you when a ROM is loaded, just like when you open the Windows game "Solitaire". Think of the emulator as the console and television combined together into one neat little window full of features. N64 emulators, as well as playstation emulators, are a little different because they require "plugins" to function. Plugins are files that carry instructions for either the graphics, sound, or input controls. Plugin based emulators do not have the instructions for graphics, sound, or input embedded into the emulators main source code. Plugins allow multiple authors to contribute versions of their plugins, which may be capable of something that another plugin cannot do. I will describe plugins in further detail in the next section
Section 3: Get Some Plugins I briefly described plugins earlier, so you know they come in three different categories: graphics, sound, and input. Project64 author "Zilmar" created the plugin specification so multiple authors could work on the graphics, sound, and input section of emulators, and be able to swap them with other emulators. This way, an emulator isn't stuck with just one instruction set and can be swapped with another made by someone not even associated with the emulator. Plugins have the extension '.dll', and sometimes an '.ini' file comes with them for configuration data. All plugins must go into the Plugins folder of the N64 emulator you wish to set up. A huge N64 Plugins Pack can be found on my Downloads page, which contains all the plugins you will need. The zip archive contains a few text files to further assist in setting up your plugins correctly. Before moving on, complete the three steps below.
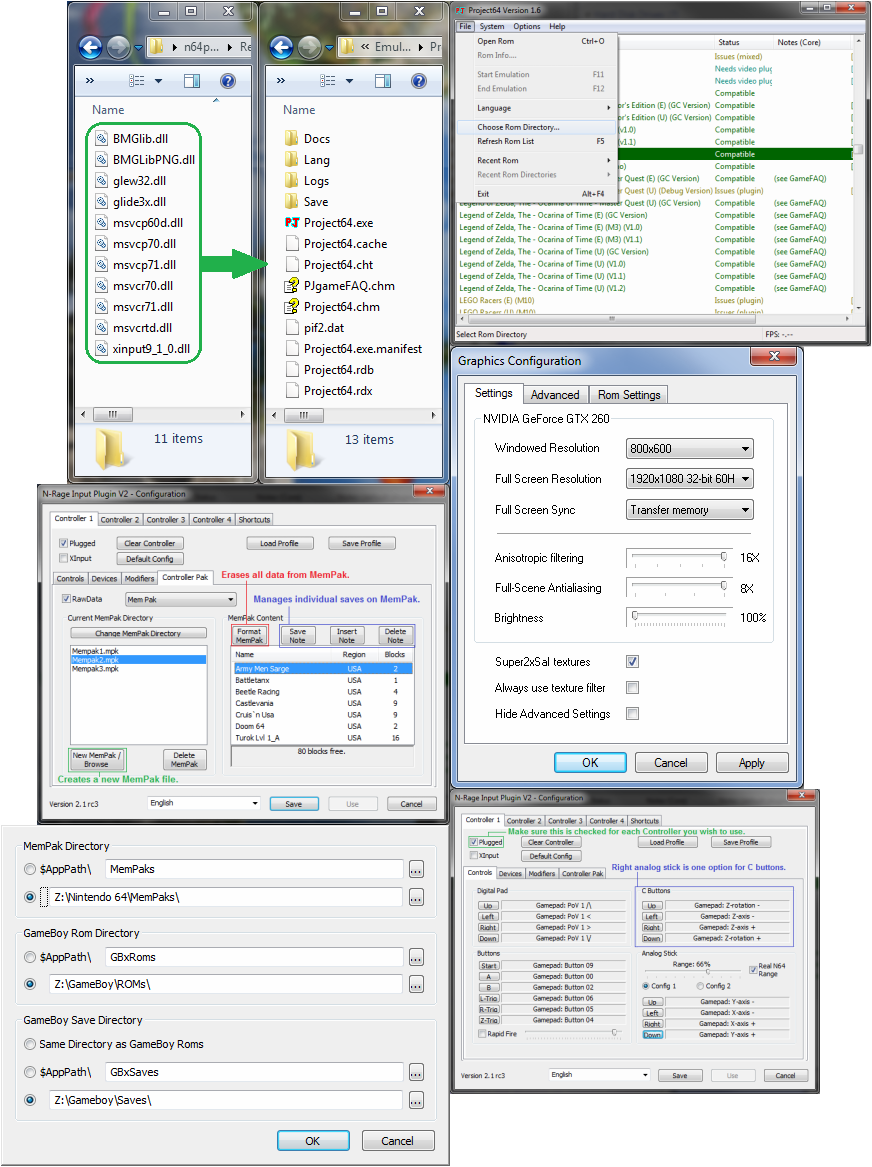
Section 4: Get it Together Take this time and visit my Downloads page to get the N64 Plugins Pack if you have not done so already. N64 plugins are not usually easy to locate, which is the reason I have created the plugins pack. Scattered over the internet are various plugins with no real archive that collects the latest work of the emulation community. This pack is an attempt to gather the most useful N64 plugins and all of the files that they require to work into one archive. I myself do not create these plugins, and I take no credit for them. I only gather them so I can help spread the authors' hard work to others, and ease the journey of those who are trying to find them. Installing plugins is very simple process. All you have to do is copy the contents of the Plugin folder found in this archive, into the Plugin folder of your emulator. Project64, Mupen64, and 1964 are great examples, because they all have a folder in their directory named "Plugin". Keep in mind, you must do this for every emulator you are installing plugins into. And, if you are installing these into any emulator other than Project64, you will want to copy Jabo's plugins (found in the PJ64 Plugin folder) into the Plugin folders of your other emulators. Refer to the document Plugins Pack ReadMe.html for an easy way to gather Jabo's plugins. Inside of the Required Files folder you will find many files with the extension .dll, identified by Windows as an "Application extension". Think of these as additional sets of instructions that plugins may need in order to load. Without these, the emulator will pop out "Plugin failed to load" error messages when it is started or when you try to configure the plugins. You will also not be able to use the plugin in the emulator because it will not show up in the list. All you need to do is simply copy all of these files into the main directory of your emulator. See the picture to the right to get a visual representation of what I am talking about. Alternative: It is also possible to copy the files to a Windows system directory where all emulators can load them, without the need of the having duplicates of the files in every single emulator folder. For 32-bit Windows operating systems, you may copy the files into the C:\Windows\SYSTEM32 folder. For 64-bit Windows operating systems, you want to copy the files into the C:\Windows\SysWOW64 folder. Replace C with whatever your drive letter is. DO NOT replace files that are already there, you may overwrite newer versions. If you are uncomfortable copying files to windows system folders, then just use the previous method of copying the .dll files into the emulators main directory. Never replace system files unless you know what exactly it is you are replacing. - Copy all plugins in the Plugin folder from the N64 Plugins Pack to the emulator's Plugin folder. - Copy all files in the Required Files folder from the N64 Plugins Pack into the main directory of the emulator. - OR, copy them to the Windows system folder which matches your operating system.
Section 5: The First Look and Initial Configuration I have chosen Project64 for this tutorial because it is the perfect emulator for a beginner to start on. Almost every emulator is set up in the same manner as Project64, so you should have no trouble setting up other emulators such as 1964 and Mupen64 after reading this tutorial. There may be a few slight differences that will throw you off, but it will become clear after experience. By this point, you should have ROMs, Project64 installed, and the plugins correctly installed. Now it is time to open up the emulator. Double click Project64.exe or open it up from a shortcut. The first thing you will see is the language selection screen. Go ahead and choose your languge and hit OK. What you see here is what you are going to play games on. Think of it as a virtual TV with a Nintendo 64 built into it. Just like most other programs, it opens into a window with a familar set of options: File, Options, and Help. The bar will also display "System" once you unhide the advanced options of the emulator. You will also notice it has a big white window which will display two things: the list of ROMs found in your ROMs folder, and the game itself after a ROM is loaded. To set the ROM directory, click File > Choose Rom Directory. Locate the folder you store your ROMs in and click OK. If the list does not display, press the F5 key. Alternatively, you can click File > Refresh Rom List. From here you can also enter the menu to choose the plugins you wish to use. Click Options > Settings. Under the 'Plugins' tab, you will notice that Jabo's Direct- plugins are chosen by default. You will probably want to use Jabo's plugins for both Video and Audio, and you will want to choose N-Rage's Direct-Input8 v2 2.2 beta for your Input plugin. Section 7 covers how to configure N-Rage's plugin in detail, for now you just want to select it. The only other tab available at this time in the Options > Settings menu is titled "Options". Click on the Options tab. You will see a checkmark next to "Hide Advanced Settings". To get the full features of Project64, you will need to unhide the advanced settings. Remove the checkmark next to this box, hit OK, and proceed to the next section
Section 6: Configuring Plugins Configuring plugins is important when it comes to getting certain games to work correctly. It is also important to know how to configure plugins to get the best experience possible when playing emulated games. Emulators are capable of enhancing the graphic and sound quality beyond that of the original system. Nintendo 64 games ran in either resolutions of 256x224 or 320x240. A resolution of 640x480 interlaced was also possible with certain games when using the Expansion Pack. Emulators can display resolutions equal to your monitors max resolution, even 16:9 or 16:10 resolutions like 1440x900 or 1920x1080 (although the image may look stretched). To open the configuration window for a plugin, click Options > then open up the type of plugin you want to configure. The plugin configuration in the picture to the right is for Jabo's Direct3D6 1.6 graphics plugin. The emulator has two resolutions to configure: the resolution while it is in window mode, and the resolution for when the emulator is in full screen mode. You will want the windowed resolution to some fraction of your screen size. A resolution of 800x600 is good for just about any monitor, and will keep the 4:3 aspect ratio of the game if you decide to play in window mode. The full screen resolution is the one that really matters, because most of the time you will want to play in full screen mode. If you have a powerful enough machine, then you will want to set the resolution to your monitor's maximum with 32-bit color at 60Hz. If you experience low framerates then turning down the resolution may help, 640x480 and lower starts to look blocky. Also, if you are playing on an old CRT television through S-Video, you won't see above 640x480 anyway. Turning up anistropic filtering will give sharper textures across objects and full-scene antialiasing will give sharper edges around objects. Both of these options will require more performance power from your PC, but if you have it, use it. Super2xSal textures will also provide visual enhancement. From the Options menu you will also notice you can configure the Audio, Controller, and RSP plugins. Section 7 explains in detail how to configure the controller plugin. The audio plugin only has two options: one for volume and another to sync the game to the audio stream. This will only need to be done for certain games, so it is best left unchecked unless it is needed. The RSP plugin should never have to be configured under most circumstances.
Section 7: Configuring N-Rage's Input Plugin Step 1: Configuring the Buttons The first step is setting up the controls you will use for your controller or keyboard. Depending on the controller you have, this can be a bit tricky because of the N64's unique controller design. In older versions of N-Rage's plugin you had to choose which controller you were going to use, now the plugin will detect input from any controller at any time. Make sure the "Plugged" box is checked or the controller will not respond during gameplay. To set up a button, simply click on the button you wish to set up with your mouse, then press a button or direction on the controller. You may also use the directions on the pad or analog stick as buttons and vice versa. A good PC controller should have at least 2 directional sticks, some top buttons (usually defined as L + R buttons), and lots of buttons on the face of the controller. The obvious best option is an actual Nintendo 64 controller with a USB adapter. The second best option would probably be a Gamecube to USB or original Xbox to USB adapter, with the Playstation style controller being the worst option but still a viable one. Because most controllers lack 6 buttons on the front, the second best option for your C-stick would be the right joystick if you have dual-analog. This could be a tricky configuration if you are attempting to play a fighting game such as Mortal Kombat that use the C buttons as punch and kick. Experiment around to get a feel for what you like.
Step 2: Choosing MemPak Directories The best part about N-Rage's input plugin is that it can emulate many of the various controller paks that were available for the N64 including the MemPak, RumblePak, and TransferPak. The first thing you will need to understand is how to correctly set up the MemPak, which was a memory card unit that plugged into the back of a Nintendo 64 controller. Games that did not have SRAM built into the cartridge needed these to save game data. A MemPak file is a virtual MemPak that we are going to virtually plug into our virtual controller. Just like a real MemPak, it can hold up to a maximum of 123 blocks for save game data.There is no limit on the number of MemPaks that can be created, so there is no real limit on the amount of save storage. It can be tricky if you want to use the same MemPaks across multiple emulators, so we have to create a global directory. To accomplish this, create a folder somewhere for your MemPak files just like you did for your ROMs. This folder is where you are going to store your MemPaks. The configuration data for N-Rage is stored in an ini file in the "Plugin" directory, so after you are done setting it up you may want to copy it to other emulator folders. Open the plugin configuration and click on the "Controller Pak" tab. To configure the paths for the plugin, make sure "RawData" is checked, and click on the "Change MemPak Directory" button. By default $AppPath\ is selected for the MemPak, GameBoy Rom, and Gameboy Save Directories. This is a problem because it will store MemPaks in the root folder of the emulator you are currently using. Change this folder to the global folder you created. As you can see in the picture it's a good idea to choose a simple location that points to a folder that can easily be identified. ROMs are stored in Z:\Nintendo 64\N64 ROMs, emulators in Z:\Nintendo 64\N64 Emulators, and all save files (SRAM and MemPaks) go into Z:\Nintendo 64\N64 Saves. This way all emulators can be configured to store and share save data from this single folder. This may have drawbacks if one emulator does not save games correctly, but this is a rare case for most games and the convenience is worth the risk. If you have a set of GameBoy ROMs, you can also point to their directory as well as the GameBoy save data. It's a good idea to use the same scheme of folder organization for all emulation. After you are finished here click OK.
Step 3: Creating and Managing MemPaks To create a new MemPak, simply click on the "New MemPak / Browse" button. This will open a window to the directory you chose for your MemPaks. Type a name and hit Open to create the new MemPak file. This button is also used to select existing MemPaks. When the MemPak is created, it will appear in the list under the "Current MemPak Directory" section. Whichever MemPak in the list that is highlighted is the Mempak that the emulator will use. The currently highlighted MemPak will also display the saves that are currently stored on the MemPak in the "MemPak Content" window. This window allows additional control over a MemPak, much like when you hold in the Start button when a game loads to access the MemPak's current saves. It displays how many blocks a save game is using, the game's Region, and the number of remaining blocks found on the MemPak. It is also possible to import and export single game saves from one MemPak to another. To export a note, simple highlight a game save and press the "Save Note" button. This will allow you to export this save data to a note file. You can then use the "Insert Note" button on a different MemPak to import the saves. And finally, the "Delete Note" button will delete the currently highlighted save data. The final button (which you should never press), is the "Format MemPak" button. This button deletes all data from the MemPak.
Section 8: Choosing the Right Emulator and Plugins So now you know what emulators and ROMs are, you know how to set up and configure the emulators, the plugins, and you even have working input controls and a virtual MemPak ready to store data. So what emulator and what plugins do you choose? Which emulator is the best, and which plugin is the best? This can be a very tricky question because remember, not all emulator and plugin combos will play every game, so there really is no single "best" option for all games. They are all good at what they can do. It may take a lot of experimentation to get the best effect for some games, or to get a game to work at all. Now that you know how to do all this, I have a huge document on N64 game settings. It is an awesome quick reference to what emulator/plugin combo to use for certain games. Don't limit yourself to just one emulator, download them all. All emulators are set up about the same as Project64, and by now you should be able to figure them all out. To easily find the some of the best emulator/plugin combos, refer to my N64 Multiple Game Configuration List. You can grab it off the downloads page, or just follow the N64 Config List link from one of the main pages from my site. It is another entire guide in itself, and it too will further assist you in getting Nintendo 64 games to work on your computer. If you came from my tutorials page, then make sure to check out some of the other great documents there. They should further assist you in setting up your N64 emulators. There are also tons of emulation forums on the web. Huge communities gather to discuss everything and anything there is about emulation. It might be a good idea to join some of these message boards so you can post questions or even offer suggestions to others. If you find yourself stuck without an answer, send me an email and I'll try to help you the best I can.
Section 9: Finally, Let's Play a Game! To load a game, simple double click a game from the list in the main window. If there is no list of games, you may need to refer back to Section 5 on how to choose the ROM directory then refresh the ROM list. If everything went well, double clicking a game should load up the game and display it in the emulators main window. You have now officially loaded a cart into your virtual Nintendo 64 and slid the power button to the "On" position. If you set up your controller correctly, the game should respond to the controller's input. You are now ready for some gaming nostalgia! Another thing you should know, is that the emulator can save your progress anywhere unlike the original Nintendo 64. This is called state saving. A state is a moment in time in which the game is captured and saved, and can be loaded from that state later on (think of it as a save anywhere feature that some PC games are capable of). To save your current game state, click on System > Save or Save As. To load a state, the N64 game must first be loaded in the emulator. Alternatively, F5 can be used to quick save, while F7 will quick load your last save state. Last but not least, if you want to enter full screen mode, hold in the Alt key and press Enter. This key combination is also used to exit fullscreen mode, and is the combination that almost all console emulators use to enter and exit fullscreen. So this concludes my tutorial. I am hoping it was thorough enough and easy enough to understand that you now have a whole new general knowledge on emulation, and have at least Project64 configured correctly to play some games. Remember to refer to my Multiple Game Configuration List if you are having trouble finding a working configuration. Find the game you want to play in the list, then apply the settings to the emulator. There is a whole lot more to learn from personal experience and browsing the web. The forums at emuXhaven, emutalk, and ngemu are a great place to go for any questions you have. There you can converse with a whole community of experts including the emulator and plugin developers, along with thousands of other members who can share their personal experiences. Have fun!
Section 1: Get some ROMs A Nintendo 64 ROM is a 'read only' file containing N64 Cartridge data that has been extracted (a.k.a. dumped) via a special device that connects a N64 game to a computer. ROM stands for 'Read Only Memory' which is exactly what the data was before it was dumped off of the cartridge. (Just to clarify, dumping isn't "taking" the data off of the cartridge, it is -copying- it from the Game Cartridge to the Hard Drive.) When you manage to find ROMs or dump them yourself, they will most likely have the default image of what appears to be a blank file, with a N64 file extension. There are several different type of N64 ROM file extensions: .n64, .z64, .u64, .rom, .v64, .usa, .pal, .j64, etc.. there may be more. So, Super Mario 64 could look like: SuperMario64.n64, SuperMario64.u64, SuperMario64.v64, or basically anything above and possibly more. I may as well mention now ROMS can even be zipped, so SuperMario64.zip is also valid. Most N64 emulators can read zipped ROMs, which can save a lot of hard drive space if you have a large collection.
Section 2: Get Some Emulators Emulators are programs that can load the ROM data and present it to you, just like a console loads a cartridge and puts a picture on your television that responds to input. The goal of an emulator is to use your computer's hardware and operating system to emulate the instructions of the console through software. With the rise of the first N64 emulator ever, UltraHLE, came the first concept of 'High Level Emulation'. In a nutshell, HLE allows programmers to cut certain corners to improve speed and image quality in emulators, allowing higher resolutions for sharper graphics, hacks, and other special effects. The original concept of emulation, which can now also be known as Low Level Emulation (LLE), is to program the emulator to perfectly emulate every one of the systems instructions. A well programmed LLE emulator would provide perfect compatibility, but at the cost of much higher system requirements and the lack of special features such as higher resolutions. You don't need to know any of this to play some games, but overall it's interesting to know so you have a better understanding of why every game does not function correctly in every emulator, if in any emulator at all. When you first load an emulator, it will open up into an initially blank window. This window will display the game contents to you when a ROM is loaded, just like when you open the Windows game "Solitaire". Think of the emulator as the console and television combined together into one neat little window full of features. N64 emulators, as well as playstation emulators, are a little different because they require "plugins" to function. Plugins are files that carry instructions for either the graphics, sound, or input controls. Plugin based emulators do not have the instructions for graphics, sound, or input embedded into the emulators main source code. Plugins allow multiple authors to contribute versions of their plugins, which may be capable of something that another plugin cannot do. I will describe plugins in further detail in the next section
Section 3: Get Some Plugins I briefly described plugins earlier, so you know they come in three different categories: graphics, sound, and input. Project64 author "Zilmar" created the plugin specification so multiple authors could work on the graphics, sound, and input section of emulators, and be able to swap them with other emulators. This way, an emulator isn't stuck with just one instruction set and can be swapped with another made by someone not even associated with the emulator. Plugins have the extension '.dll', and sometimes an '.ini' file comes with them for configuration data. All plugins must go into the Plugins folder of the N64 emulator you wish to set up. A huge N64 Plugins Pack can be found on my Downloads page, which contains all the plugins you will need. The zip archive contains a few text files to further assist in setting up your plugins correctly. Before moving on, complete the three steps below.
Section 4: Get it Together Take this time and visit my Downloads page to get the N64 Plugins Pack if you have not done so already. N64 plugins are not usually easy to locate, which is the reason I have created the plugins pack. Scattered over the internet are various plugins with no real archive that collects the latest work of the emulation community. This pack is an attempt to gather the most useful N64 plugins and all of the files that they require to work into one archive. I myself do not create these plugins, and I take no credit for them. I only gather them so I can help spread the authors' hard work to others, and ease the journey of those who are trying to find them. Installing plugins is very simple process. All you have to do is copy the contents of the Plugin folder found in this archive, into the Plugin folder of your emulator. Project64, Mupen64, and 1964 are great examples, because they all have a folder in their directory named "Plugin". Keep in mind, you must do this for every emulator you are installing plugins into. And, if you are installing these into any emulator other than Project64, you will want to copy Jabo's plugins (found in the PJ64 Plugin folder) into the Plugin folders of your other emulators. Refer to the document Plugins Pack ReadMe.html for an easy way to gather Jabo's plugins. Inside of the Required Files folder you will find many files with the extension .dll, identified by Windows as an "Application extension". Think of these as additional sets of instructions that plugins may need in order to load. Without these, the emulator will pop out "Plugin failed to load" error messages when it is started or when you try to configure the plugins. You will also not be able to use the plugin in the emulator because it will not show up in the list. All you need to do is simply copy all of these files into the main directory of your emulator. See the picture to the right to get a visual representation of what I am talking about. Alternative: It is also possible to copy the files to a Windows system directory where all emulators can load them, without the need of the having duplicates of the files in every single emulator folder. For 32-bit Windows operating systems, you may copy the files into the C:\Windows\SYSTEM32 folder. For 64-bit Windows operating systems, you want to copy the files into the C:\Windows\SysWOW64 folder. Replace C with whatever your drive letter is. DO NOT replace files that are already there, you may overwrite newer versions. If you are uncomfortable copying files to windows system folders, then just use the previous method of copying the .dll files into the emulators main directory. Never replace system files unless you know what exactly it is you are replacing. - Copy all plugins in the Plugin folder from the N64 Plugins Pack to the emulator's Plugin folder. - Copy all files in the Required Files folder from the N64 Plugins Pack into the main directory of the emulator. - OR, copy them to the Windows system folder which matches your operating system.
Section 5: The First Look and Initial Configuration I have chosen Project64 for this tutorial because it is the perfect emulator for a beginner to start on. Almost every emulator is set up in the same manner as Project64, so you should have no trouble setting up other emulators such as 1964 and Mupen64 after reading this tutorial. There may be a few slight differences that will throw you off, but it will become clear after experience. By this point, you should have ROMs, Project64 installed, and the plugins correctly installed. Now it is time to open up the emulator. Double click Project64.exe or open it up from a shortcut. The first thing you will see is the language selection screen. Go ahead and choose your languge and hit OK. What you see here is what you are going to play games on. Think of it as a virtual TV with a Nintendo 64 built into it. Just like most other programs, it opens into a window with a familar set of options: File, Options, and Help. The bar will also display "System" once you unhide the advanced options of the emulator. You will also notice it has a big white window which will display two things: the list of ROMs found in your ROMs folder, and the game itself after a ROM is loaded. To set the ROM directory, click File > Choose Rom Directory. Locate the folder you store your ROMs in and click OK. If the list does not display, press the F5 key. Alternatively, you can click File > Refresh Rom List. From here you can also enter the menu to choose the plugins you wish to use. Click Options > Settings. Under the 'Plugins' tab, you will notice that Jabo's Direct- plugins are chosen by default. You will probably want to use Jabo's plugins for both Video and Audio, and you will want to choose N-Rage's Direct-Input8 v2 2.2 beta for your Input plugin. Section 7 covers how to configure N-Rage's plugin in detail, for now you just want to select it. The only other tab available at this time in the Options > Settings menu is titled "Options". Click on the Options tab. You will see a checkmark next to "Hide Advanced Settings". To get the full features of Project64, you will need to unhide the advanced settings. Remove the checkmark next to this box, hit OK, and proceed to the next section
Section 6: Configuring Plugins Configuring plugins is important when it comes to getting certain games to work correctly. It is also important to know how to configure plugins to get the best experience possible when playing emulated games. Emulators are capable of enhancing the graphic and sound quality beyond that of the original system. Nintendo 64 games ran in either resolutions of 256x224 or 320x240. A resolution of 640x480 interlaced was also possible with certain games when using the Expansion Pack. Emulators can display resolutions equal to your monitors max resolution, even 16:9 or 16:10 resolutions like 1440x900 or 1920x1080 (although the image may look stretched). To open the configuration window for a plugin, click Options > then open up the type of plugin you want to configure. The plugin configuration in the picture to the right is for Jabo's Direct3D6 1.6 graphics plugin. The emulator has two resolutions to configure: the resolution while it is in window mode, and the resolution for when the emulator is in full screen mode. You will want the windowed resolution to some fraction of your screen size. A resolution of 800x600 is good for just about any monitor, and will keep the 4:3 aspect ratio of the game if you decide to play in window mode. The full screen resolution is the one that really matters, because most of the time you will want to play in full screen mode. If you have a powerful enough machine, then you will want to set the resolution to your monitor's maximum with 32-bit color at 60Hz. If you experience low framerates then turning down the resolution may help, 640x480 and lower starts to look blocky. Also, if you are playing on an old CRT television through S-Video, you won't see above 640x480 anyway. Turning up anistropic filtering will give sharper textures across objects and full-scene antialiasing will give sharper edges around objects. Both of these options will require more performance power from your PC, but if you have it, use it. Super2xSal textures will also provide visual enhancement. From the Options menu you will also notice you can configure the Audio, Controller, and RSP plugins. Section 7 explains in detail how to configure the controller plugin. The audio plugin only has two options: one for volume and another to sync the game to the audio stream. This will only need to be done for certain games, so it is best left unchecked unless it is needed. The RSP plugin should never have to be configured under most circumstances.
Section 7: Configuring N-Rage's Input Plugin Step 1: Configuring the Buttons The first step is setting up the controls you will use for your controller or keyboard. Depending on the controller you have, this can be a bit tricky because of the N64's unique controller design. In older versions of N-Rage's plugin you had to choose which controller you were going to use, now the plugin will detect input from any controller at any time. Make sure the "Plugged" box is checked or the controller will not respond during gameplay. To set up a button, simply click on the button you wish to set up with your mouse, then press a button or direction on the controller. You may also use the directions on the pad or analog stick as buttons and vice versa. A good PC controller should have at least 2 directional sticks, some top buttons (usually defined as L + R buttons), and lots of buttons on the face of the controller. The obvious best option is an actual Nintendo 64 controller with a USB adapter. The second best option would probably be a Gamecube to USB or original Xbox to USB adapter, with the Playstation style controller being the worst option but still a viable one. Because most controllers lack 6 buttons on the front, the second best option for your C-stick would be the right joystick if you have dual-analog. This could be a tricky configuration if you are attempting to play a fighting game such as Mortal Kombat that use the C buttons as punch and kick. Experiment around to get a feel for what you like.
Step 2: Choosing MemPak Directories The best part about N-Rage's input plugin is that it can emulate many of the various controller paks that were available for the N64 including the MemPak, RumblePak, and TransferPak. The first thing you will need to understand is how to correctly set up the MemPak, which was a memory card unit that plugged into the back of a Nintendo 64 controller. Games that did not have SRAM built into the cartridge needed these to save game data. A MemPak file is a virtual MemPak that we are going to virtually plug into our virtual controller. Just like a real MemPak, it can hold up to a maximum of 123 blocks for save game data.There is no limit on the number of MemPaks that can be created, so there is no real limit on the amount of save storage. It can be tricky if you want to use the same MemPaks across multiple emulators, so we have to create a global directory. To accomplish this, create a folder somewhere for your MemPak files just like you did for your ROMs. This folder is where you are going to store your MemPaks. The configuration data for N-Rage is stored in an ini file in the "Plugin" directory, so after you are done setting it up you may want to copy it to other emulator folders. Open the plugin configuration and click on the "Controller Pak" tab. To configure the paths for the plugin, make sure "RawData" is checked, and click on the "Change MemPak Directory" button. By default $AppPath\ is selected for the MemPak, GameBoy Rom, and Gameboy Save Directories. This is a problem because it will store MemPaks in the root folder of the emulator you are currently using. Change this folder to the global folder you created. As you can see in the picture it's a good idea to choose a simple location that points to a folder that can easily be identified. ROMs are stored in Z:\Nintendo 64\N64 ROMs, emulators in Z:\Nintendo 64\N64 Emulators, and all save files (SRAM and MemPaks) go into Z:\Nintendo 64\N64 Saves. This way all emulators can be configured to store and share save data from this single folder. This may have drawbacks if one emulator does not save games correctly, but this is a rare case for most games and the convenience is worth the risk. If you have a set of GameBoy ROMs, you can also point to their directory as well as the GameBoy save data. It's a good idea to use the same scheme of folder organization for all emulation. After you are finished here click OK.
Step 3: Creating and Managing MemPaks To create a new MemPak, simply click on the "New MemPak / Browse" button. This will open a window to the directory you chose for your MemPaks. Type a name and hit Open to create the new MemPak file. This button is also used to select existing MemPaks. When the MemPak is created, it will appear in the list under the "Current MemPak Directory" section. Whichever MemPak in the list that is highlighted is the Mempak that the emulator will use. The currently highlighted MemPak will also display the saves that are currently stored on the MemPak in the "MemPak Content" window. This window allows additional control over a MemPak, much like when you hold in the Start button when a game loads to access the MemPak's current saves. It displays how many blocks a save game is using, the game's Region, and the number of remaining blocks found on the MemPak. It is also possible to import and export single game saves from one MemPak to another. To export a note, simple highlight a game save and press the "Save Note" button. This will allow you to export this save data to a note file. You can then use the "Insert Note" button on a different MemPak to import the saves. And finally, the "Delete Note" button will delete the currently highlighted save data. The final button (which you should never press), is the "Format MemPak" button. This button deletes all data from the MemPak.
Section 8: Choosing the Right Emulator and Plugins So now you know what emulators and ROMs are, you know how to set up and configure the emulators, the plugins, and you even have working input controls and a virtual MemPak ready to store data. So what emulator and what plugins do you choose? Which emulator is the best, and which plugin is the best? This can be a very tricky question because remember, not all emulator and plugin combos will play every game, so there really is no single "best" option for all games. They are all good at what they can do. It may take a lot of experimentation to get the best effect for some games, or to get a game to work at all. Now that you know how to do all this, I have a huge document on N64 game settings. It is an awesome quick reference to what emulator/plugin combo to use for certain games. Don't limit yourself to just one emulator, download them all. All emulators are set up about the same as Project64, and by now you should be able to figure them all out. To easily find the some of the best emulator/plugin combos, refer to my N64 Multiple Game Configuration List. You can grab it off the downloads page, or just follow the N64 Config List link from one of the main pages from my site. It is another entire guide in itself, and it too will further assist you in getting Nintendo 64 games to work on your computer. If you came from my tutorials page, then make sure to check out some of the other great documents there. They should further assist you in setting up your N64 emulators. There are also tons of emulation forums on the web. Huge communities gather to discuss everything and anything there is about emulation. It might be a good idea to join some of these message boards so you can post questions or even offer suggestions to others. If you find yourself stuck without an answer, send me an email and I'll try to help you the best I can.
Section 9: Finally, Let's Play a Game! To load a game, simple double click a game from the list in the main window. If there is no list of games, you may need to refer back to Section 5 on how to choose the ROM directory then refresh the ROM list. If everything went well, double clicking a game should load up the game and display it in the emulators main window. You have now officially loaded a cart into your virtual Nintendo 64 and slid the power button to the "On" position. If you set up your controller correctly, the game should respond to the controller's input. You are now ready for some gaming nostalgia! Another thing you should know, is that the emulator can save your progress anywhere unlike the original Nintendo 64. This is called state saving. A state is a moment in time in which the game is captured and saved, and can be loaded from that state later on (think of it as a save anywhere feature that some PC games are capable of). To save your current game state, click on System > Save or Save As. To load a state, the N64 game must first be loaded in the emulator. Alternatively, F5 can be used to quick save, while F7 will quick load your last save state. Last but not least, if you want to enter full screen mode, hold in the Alt key and press Enter. This key combination is also used to exit fullscreen mode, and is the combination that almost all console emulators use to enter and exit fullscreen. So this concludes my tutorial. I am hoping it was thorough enough and easy enough to understand that you now have a whole new general knowledge on emulation, and have at least Project64 configured correctly to play some games. Remember to refer to my Multiple Game Configuration List if you are having trouble finding a working configuration. Find the game you want to play in the list, then apply the settings to the emulator. There is a whole lot more to learn from personal experience and browsing the web. The forums at emuXhaven, emutalk, and ngemu are a great place to go for any questions you have. There you can converse with a whole community of experts including the emulator and plugin developers, along with thousands of other members who can share their personal experiences. Have fun!