NES Tutorial
A Short Introduction
This guide is strictly for NES emulation newcomers, and wasn't intended for intermediate to advanced emulation users. The information in this tutorial is broken down to a simple level, so advanced users will most likely not benefit from this. But, if you find this guide adequate enough for a newcomer, then by all means, send him here.
Hopefully this tutorial will help you learn how to play the classic Nintendo on your computer if you don't know how. The goal of this tutorial was to make it simple enough for even a child to understand, it just takes a little bit of patience. The only thing I can't do, is tell you where to find ROMs; that you have to figure out on your own. Back to the tutorial, I start out telling you to download things, and work you into everything. If you think you can handle it, then read on....
Also, don't mind the black borders around the pictures. Older versions of this tutorial used a pure black background, so I got lazy making the pics with text. It's really no big deal though. This is a tutorial, not an art gallery. I'll eventually update the pics to newer ones, just not in this revision.
Section 1: Get some ROMs
A Nintendo ROM is a 'read only' file containing NES Cartridge data that has been extracted (a.k.a. dumped) via a special device that hooks up an NES game to a computer. ROM stands for (Read Only Memory) which is exactly what the data was before it was dumped off of the cartridge. {Just to clarify, dumping isn't "taking" the data off of the cartridge, it is -copying- it from Game Cartridge to Hard Drive.} When you manage to find ROMs or dump them yourself, they will mostly appear to be nothing more than what appears to be a blank file, with a .nes file extension. The Japan versions of games for the Japenese version of the Nintendo, the Famicon, are also supported in most emulators. Alternatively, Famicon dumps will have the file extension .fds for Famicon Disk System. I may as well mention now ROMS can even be zipped, so both SuperMarioBros.nes and SumperMarioBros.zip are both valid file names. Most NES emulators can read zipped ROMs, which can save a lot of hard drive space if you have a large collection.
Each ROM also has a country associated with it, the two most common being [U] - USA and [J] - Japan. Use the tool "GoodNES" to see if your ROMs are a verfied good dump. A verified good dump will be renamed to have a [!] at the end of their file name, but most NES ROMs don't. The ROMs you especially want to avoid playing will have a [b] in brackets, which means that it is a bad dump. Unfortunately, I cannot link you to ROMs because you are only legally allowed to own ROM dumps of cartridges that you own. Before you move on to Section 2 of this tutorial, find yourself some ROMs. After you find some, you will see just how easy they are to find.
When you download NES ROMs, make sure you put them all into one folder. The emulator can't look all over your computer for ROM's, it has to know where all of them are at the same time. So create a folder for your collection of ROMs, and put them all in it. Later on, it will be explained how to load them in the emulator. Emulators and GoodNES can read zipped ROMs, so if you understand how to compress files into zip format, then it is a good idea to compress your ROM collection. Keep in mind, all ROMs must be zipped into seperate archives.
- Go get some ROMs before reading on!
Section 2: Get Some Emulators
A brief description of emulators: emulators are programs that will play the game data (ROM files) that you just spent time looking for. An emulator is a program developed by very dedicated human being just like me and you, that " emulates" the system on your computer. The goal of an emulator is to use your computer's hardware to execute the instructions of the game system's software/hardware. The result - hours of nostalgia playing your favorite classic video game titles.
Nestopia: Hands down the best NES emulator of all when it comes to features, compatibility, and speed, and support for almost all controller accessories.
FCEUltra: Another one of the better NES emulators available. Like Nestopia, this one also has Zapper support.
NNNesterJ: This is also another excellent NES emulator with great compatibility.
There are many more emulators out there, but these three are some of the most popular and compatible. No one emulator is better than the other, but some emulators will play some games that others won't. My suggestion is to download them all and try them all. The emulator I will use in this tutorial is NNNesterJ, which is a great emulator to start on.
Section 3: Setting up NNNesterJ
Now it is time to set up the emulator so that it will play ROMs. NNNesterJ was chosen because it an easy to understand and easy to explain, being it that doesn't have a whole lot of features that some of the other ones do. When starting out with anything, the simpler the better.
Step 1: Download and Open the emulator.
After you download it, unzip the contents, and open up the emulator by double clicking "nnesterj.exe". You will see the following window pop up. This is the emulator, it will play the games for us.
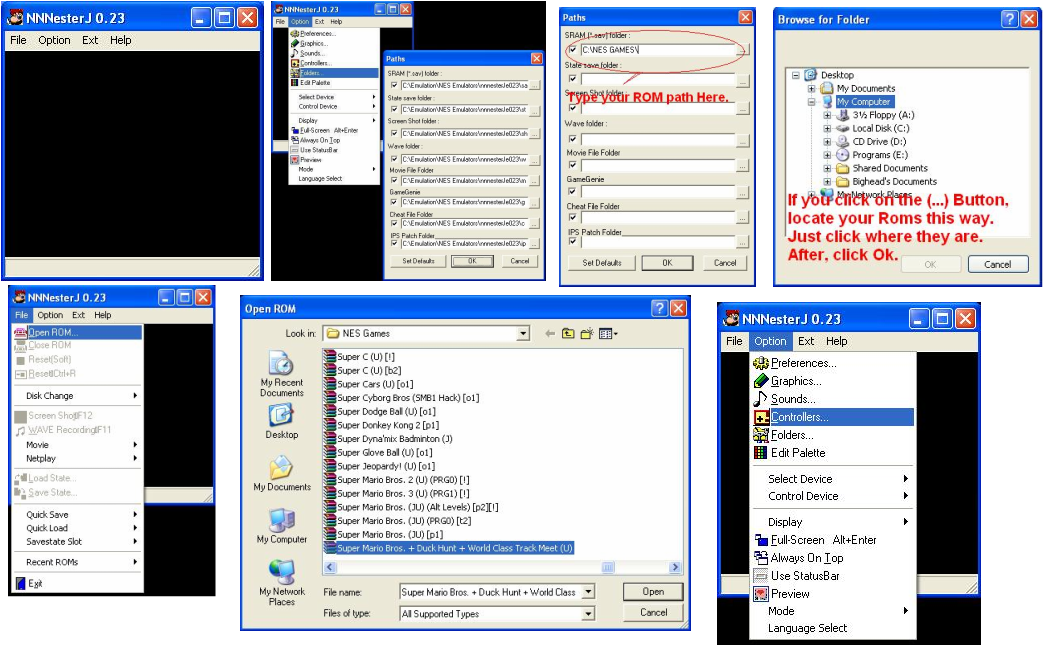
Step 2: Paths, and Some Info on Game Saves
The emulator saves many types of files, and you will want to know where these files are going. It's probably best to keep the default locations for your save data, but it's also good to know that these files exist and where they are saving to. If you look at the picture, SRAM files are the "battery backed memory" that some NES games had (like The Legend of Zelda), that store your saved game data. The State save folder are where your save states are stored. A "save state" file is a moment in time you can save your game, and load it right from where you saved it. This means you can pretty much save any NES game anywhere, even games you couldn't normally save on the original system! To assign folders, you can either type in where you want your saves to go, or click on the (...) button and manually locate the directory.
Step 3: Set up your Controls
Now it's time to set up your controls with a game controller, joystick, or keyboard. Unlike the original system, it's not as easy as 'plug it in and play', you have to define the action for every button manually. To do this, click on Option, then Controllers. To set a key or direction with your Keyboard or Joystick, click the blue space you want to set and press the button that corresponds to the button you want to set on your device. For example, if you want to make the "A" button "Z" on your Keyboard, click on blue space marked "A" and hit the button "Z". Do this for all of your buttons, and you are almost all ready to play.
Step 4: Opening a ROM
Now it's time to load a ROM into the emulator so we can get to the good part. Click File, Open ROM... Browse to the folder that you stored your ROM files in, and a window will show with your ROM collection. Just simply double click a ROM file to load it up. Here we're choosing Super Mario Bros + Duck Hunt + World Class Track Meet, which by the way was my first and favorite NES cartridge growing up.
Step 5: Enter Nostalgia...
Congratulations, you have successfully set up the emulator and loaded a ROM file. Just like the original Nintendo, it will load up the cartridge of your choice so you can play. If you wish, you can enter and exit full screen by pressing [Alt+Enter]. You should remember this, because every emulator for almost every system have this feature. If you do not own a controller, I suggest buying one because emulation sucks playing on your keyboard. A good choice is a Playstation controller adapter or any controller that resembles a playstation controller. And that's it, you are now ready to play. Enjoy!
Let's save the Princess one more time
This guide is strictly for NES emulation newcomers, and wasn't intended for intermediate to advanced emulation users. The information in this tutorial is broken down to a simple level, so advanced users will most likely not benefit from this. But, if you find this guide adequate enough for a newcomer, then by all means, send him here.
Hopefully this tutorial will help you learn how to play the classic Nintendo on your computer if you don't know how. The goal of this tutorial was to make it simple enough for even a child to understand, it just takes a little bit of patience. The only thing I can't do, is tell you where to find ROMs; that you have to figure out on your own. Back to the tutorial, I start out telling you to download things, and work you into everything. If you think you can handle it, then read on....
Also, don't mind the black borders around the pictures. Older versions of this tutorial used a pure black background, so I got lazy making the pics with text. It's really no big deal though. This is a tutorial, not an art gallery. I'll eventually update the pics to newer ones, just not in this revision.
Section 1: Get some ROMs
A Nintendo ROM is a 'read only' file containing NES Cartridge data that has been extracted (a.k.a. dumped) via a special device that hooks up an NES game to a computer. ROM stands for (Read Only Memory) which is exactly what the data was before it was dumped off of the cartridge. {Just to clarify, dumping isn't "taking" the data off of the cartridge, it is -copying- it from Game Cartridge to Hard Drive.} When you manage to find ROMs or dump them yourself, they will mostly appear to be nothing more than what appears to be a blank file, with a .nes file extension. The Japan versions of games for the Japenese version of the Nintendo, the Famicon, are also supported in most emulators. Alternatively, Famicon dumps will have the file extension .fds for Famicon Disk System. I may as well mention now ROMS can even be zipped, so both SuperMarioBros.nes and SumperMarioBros.zip are both valid file names. Most NES emulators can read zipped ROMs, which can save a lot of hard drive space if you have a large collection.
Each ROM also has a country associated with it, the two most common being [U] - USA and [J] - Japan. Use the tool "GoodNES" to see if your ROMs are a verfied good dump. A verified good dump will be renamed to have a [!] at the end of their file name, but most NES ROMs don't. The ROMs you especially want to avoid playing will have a [b] in brackets, which means that it is a bad dump. Unfortunately, I cannot link you to ROMs because you are only legally allowed to own ROM dumps of cartridges that you own. Before you move on to Section 2 of this tutorial, find yourself some ROMs. After you find some, you will see just how easy they are to find.
When you download NES ROMs, make sure you put them all into one folder. The emulator can't look all over your computer for ROM's, it has to know where all of them are at the same time. So create a folder for your collection of ROMs, and put them all in it. Later on, it will be explained how to load them in the emulator. Emulators and GoodNES can read zipped ROMs, so if you understand how to compress files into zip format, then it is a good idea to compress your ROM collection. Keep in mind, all ROMs must be zipped into seperate archives.
- Go get some ROMs before reading on!
Section 2: Get Some Emulators
A brief description of emulators: emulators are programs that will play the game data (ROM files) that you just spent time looking for. An emulator is a program developed by very dedicated human being just like me and you, that " emulates" the system on your computer. The goal of an emulator is to use your computer's hardware to execute the instructions of the game system's software/hardware. The result - hours of nostalgia playing your favorite classic video game titles.
Nestopia: Hands down the best NES emulator of all when it comes to features, compatibility, and speed, and support for almost all controller accessories.
FCEUltra: Another one of the better NES emulators available. Like Nestopia, this one also has Zapper support.
NNNesterJ: This is also another excellent NES emulator with great compatibility.
There are many more emulators out there, but these three are some of the most popular and compatible. No one emulator is better than the other, but some emulators will play some games that others won't. My suggestion is to download them all and try them all. The emulator I will use in this tutorial is NNNesterJ, which is a great emulator to start on.
Section 3: Setting up NNNesterJ
Now it is time to set up the emulator so that it will play ROMs. NNNesterJ was chosen because it an easy to understand and easy to explain, being it that doesn't have a whole lot of features that some of the other ones do. When starting out with anything, the simpler the better.
Step 1: Download and Open the emulator.
After you download it, unzip the contents, and open up the emulator by double clicking "nnesterj.exe". You will see the following window pop up. This is the emulator, it will play the games for us.
Step 2: Paths, and Some Info on Game Saves
The emulator saves many types of files, and you will want to know where these files are going. It's probably best to keep the default locations for your save data, but it's also good to know that these files exist and where they are saving to. If you look at the picture, SRAM files are the "battery backed memory" that some NES games had (like The Legend of Zelda), that store your saved game data. The State save folder are where your save states are stored. A "save state" file is a moment in time you can save your game, and load it right from where you saved it. This means you can pretty much save any NES game anywhere, even games you couldn't normally save on the original system! To assign folders, you can either type in where you want your saves to go, or click on the (...) button and manually locate the directory.
Step 3: Set up your Controls
Now it's time to set up your controls with a game controller, joystick, or keyboard. Unlike the original system, it's not as easy as 'plug it in and play', you have to define the action for every button manually. To do this, click on Option, then Controllers. To set a key or direction with your Keyboard or Joystick, click the blue space you want to set and press the button that corresponds to the button you want to set on your device. For example, if you want to make the "A" button "Z" on your Keyboard, click on blue space marked "A" and hit the button "Z". Do this for all of your buttons, and you are almost all ready to play.
Step 4: Opening a ROM
Now it's time to load a ROM into the emulator so we can get to the good part. Click File, Open ROM... Browse to the folder that you stored your ROM files in, and a window will show with your ROM collection. Just simply double click a ROM file to load it up. Here we're choosing Super Mario Bros + Duck Hunt + World Class Track Meet, which by the way was my first and favorite NES cartridge growing up.
Step 5: Enter Nostalgia...
Congratulations, you have successfully set up the emulator and loaded a ROM file. Just like the original Nintendo, it will load up the cartridge of your choice so you can play. If you wish, you can enter and exit full screen by pressing [Alt+Enter]. You should remember this, because every emulator for almost every system have this feature. If you do not own a controller, I suggest buying one because emulation sucks playing on your keyboard. A good choice is a Playstation controller adapter or any controller that resembles a playstation controller. And that's it, you are now ready to play. Enjoy!
Let's save the Princess one more time